home about me home tour consultations testimonials contact

Tuesday, January 31, 2012

Winner, winner, chicken dinner!

Hey friends! Today I'm telling you about something I hope to win and then I'll share with you something I did win.

First up, I'm going to shamelessly beg ask you to vote for me here. Apparently, I entered a photo contest that I didn't even realize I was entering. I was uploading pictures to the Better Homes and Gardens site in hopes of increasing a little traffic to my teensy little blog and then I received an email letting me know my photo was in the running for their weekly Photo Faves. Happy dance going on! (It was a pic. of our diamond wall in case you were wondering.)

So, did I mention you can go HERE to vote? Oh yeah, maybe I did that already. But guess what? You can vote once a day until Feb. 2nd. Please and Thank You, friends!
Enough with the self-promoting. Don't you hate it when people do that?

Anyway, several weeks ago, Jessica from Hill Country Homebody, contacted me and told me to sign up for a giveaway on Jamie's blog, C.R.A.F.T. So glad I did because guess what? I won! Jamie was giving away 2 spots at Painting with a Twist. We were lucky enough to be joined by Allison, from House of Hepworths, too. It was so much fun getting to know these girls. I'm a people person and I really liked putting a real person with the blog voice.
So, what the heck is Painting with a Twist, you ask? Well, you see, we're all amazing artists that get together to see who can paint the prettiest peacock. Yeah, right! I've never painted a canvas before so I was pumped to see if the idea behind this "ladies night" would actually produce a decent piece of art.

Here are a few more pictures to help you get a good feel for how it all went down.
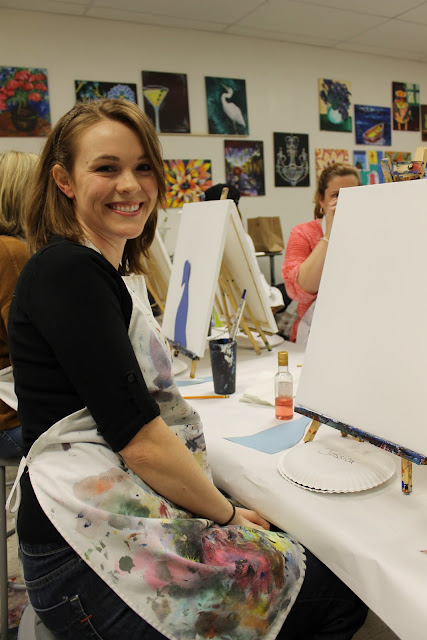
 Proof that our canvases were blank when we started.

 Next step...peacock body.

Way cool teacher. She walks you through this process and tells you step by step what to do.

 Most of us deviated a little from the suggested color scheme and added a personal touch. Rules? What rules?

 Oh, yes, she's a blogger...must document!

So. much. fun! If there's a place like this in your city, I say grab a friend and go do it. I looked around the room and honestly, everyone's paintings really turned out nice. It's not just peacocks, Painting with a Twist lists a calendar with different paintings and you sign up for the one you'd like to paint. Thanks, Jamie, for the great experience!

That's all for today friends! If you'd like some peacock painting tips, make sure you visit these awesome ladies at their "homes/blogs!"

Monday, January 30, 2012

FORE...Tips for serving up an amazing baby shower!

 As promised, today you get to see our out of control baby shower for my sweet friend, Katie. We took elements of her Vintage Mod Golf Nursery and carried them into a super fun shower. Katie's anxiously awaiting baby #4 which just happens to be a little boy. His 3 sisters are pumped!

Let's take a picture tour of the shower and I'll pass on a few tips as we go.

First impressions are huge...guests arrived to a grand entrance complete with golf cart, clubs, candlelight and a turf runway!


Katie was a little in shock at this point. I think she was still trying to wrap her brain around everything!


Looking for something original? Throw a handful of golf clubs in a vase and surround it with greenery for a one-of-a-kind flower arrangement.

Traditional flowers are fun too, of course!

Katie hasn't decided on a name yet, so guests were encouraged to write their suggestions on golf balls!


We hit up an artificial turf manufacturer and purchased remnants. Then we cut them to size and lined the tables and bar. It was adorable and the texture it brought to the decor was awesome.


 When creating tablescapes, make sure you have varying heights of decor items and add in multiple layers. This keeps the eye moving as it's taking in the prettiness!

  Now, let's talk food. If I were a betting woman, I'd say this had to be Katie's favorite part. Katie admits to only attending certain functions because of the food! No pressure there, right?        


Notice the attention to detail in these fruit kabobs. Yes, the skewers are topped with golf club heads. Kuddos to the friend who took on this time-consuming task!

Another pearl of wisdom to take into consideration is to divide and conquer. Throwing a shower with multiple friends helps pool resources and alleviate stress. I was fortunate enough to share these responsibilities with 3 other friends, each of whom is very talented and creative! 

Also, don't be afraid to think beyond your local party store when looking for supplies. 

Plastic martini glasses were purchased from a restaurant supply company and made for a classy presentation of our Shirley Temples. 

Look on Etsy for special touches that make your party memorable. These straws played well into our vintage golf theme.

 We set up a self-serve salad bar complete with every topping you could think of. The over-sized martini glasses were perfect for holding the goodies. Pretty sure no one went home hungry that night!

No shower is complete without a cake. That's the best part, right?
Chocolate covered oreo balls were served up on golf tees and guests could pick one (or two or three) to add the perfect compliment to their vanilla cake.

Did you catch our crude humor in the little frame accompanying the cake? We just couldn't resist. It reads, "Finally, A Baby with Balls!" Remember...3 girls and 1 boy!

Well friends, I hope you enjoyed Katie's baby shower. You can mail your gifts to 5315 Golf Course Rd. Ha! Just kidding! 

Stop back by to check out her completed nursery reveal. Wondering why it's not complete? We're waiting on Katie and her hubby to decide on the name! You can't have an "initial" focal point wall without a name! Come on guys...the blogosphere is waiting!

If you're interested in design help for your own house, contact me. Edesign available!

Friday, January 27, 2012

Golf Ball Flowers: How-to Guide

Whew...this has been a c-r-a-z-y week! Between managing cookie sales for my daughter's entire Girl Scout troop, planning/co-hosting my best friend's baby nursery, hitting a must-go-to furniture sale and working on a kitchen remodel project...I'm pooped! Oh, and did I mention that my car decided to completely DIE in the middle of the week, in the middle of rush hour traffic?!! I was totally thinking nice thoughts about the police officer when he so kindly informed me I was "creating an unsafe traffic situation!" REALLY??!!


Moving on...
Here's a little DIY project I worked on for the shower. I'm starting to see a trend around here...I like to post projects for you guys on Fridays so you can be inspired and "play" over the weekend.

Before you think, "What in the world...I thought it was a baby shower?," I need to explain that we took the golf theme of Katie's nursery and ran with it. Next week I plan to post pictures from the shower. It was out of control (in a good way!).

How about golf ball flowers?...


This is actually the second time I've made this spiffy little arrangement. It all started when John and I were dating. It was Valentine's Day and I was trying to think of something a little different to do for  him. I figured sending him flowers would be a little lame so I decided to combine the "traditional" gift with one of his "loves," i.e. golf. Thus, the birth of this creation!

Let's break it on down now so that you can do it.

Supplies:
*plastic cups
*skinny dowel rods
*green floral tape
*red and green tissue paper
*vase
*vase filler (I used nuts and moss, but marbles look great too)
*ribbon
*lighter
*saw
*golf balls

Use the lighter to melt the bottom of the cup. This only takes a few seconds. When you notice the plastic beginning to change form, push the dowel into the bottom of the cup and slightly twist the dowel. You'll see the plastic wrap around the rod. As it cools, the dowel is now enclosed by the plastic. This is what provides stability. Repeat this step until you have the desired amount of "flowers."

Use the saw to make your "stems" varying lengths.

Fill the vase with filler and begin to "arrange" your flowers. 

Wrap each dowel with floral tape.


Here's a close-up of the bottoms of the cups. If some are burned, no worries, they'll be covered soon.

 Now, unwrap a single sheet of red tissue paper. Softly poke the end of the dowel through the center of the sheet. 
 Carefully, work the paper up the dowel to the bottom of the cup.

Now fold the tissue around the cup and begin to push the excess into the center of the cup. 

The excess provides a cushion for the golf ball.

Repeat this process until all "flowers" have bloomed! 


Use the green tissue papers to fill in the dead space and create the look of floral greenery.

All that's left is to carefully place a golf ball inside of each flower and you're done! Let's take one more look at the final project, shall we?

File this one away, friends. Valentine's Day is just around the corner. If you have a golfer in your life, surprise them with something original this year!

Don't have a golfer? That's okay...you can revise this project numerous ways. Fill the flowers with his favorite candy, love coupons or any other little trinket. The best part? These flowers don't die!

Have a fun weekend, friends! I'm excited to say we have nothing planned. Hooray for rest!

If you're looking to create something fun in your house, contact me! E-design available.

Linking to: C.R.A.F.T.

Thursday, January 26, 2012

Random Act of Kindness #20

Doesn't the site of balloons make you a little giddy inside? I think we're programmed like this from childhood. Think about it, most every time you see a balloon it symbolizes something fun and exciting!
{via}
Pin It
Random Act of Kindness Challenge #19: Surprise a child with balloons, just because!

This past week, one of my sweet, 6 y.o. neighbors had surgery. I snuck into her house while they were at the hospital and left 3 balloons attached to a bag of Ring Pops sitting on her bed. When she came home, she was greeted with a treat! I watched her carry around those balloons for the next 3 days. Too cute!

Helpful hint: If you're watching your pennies, avoid buying the balloons at the grocery store or a party store. I bought 3 mylar balloons and the Ring Pops at the Dollar Store. Yep...passed on a smile for less than $4.50.

Okay friends, it's your turn. It'd be super fun to ding dong ditch your RAK target and have them open the door to a little surprise.

Are you up for the challenge? I'd love to know your plans!

Are you new to RAK challenges? If so, jump on over to the search box in the sidebar and type 'RAK.' There are 19 other ways you can start spreading kindness!

Wednesday, January 25, 2012

I Heart Succulent Terrariums

 As I walked into West Elm earlier this week, they were in the midst of setting up a display using succulents. It was ever so enticing and they hadn't even completed it! 
{West Elm Succulents}
What is it about these little lovelies that is so fascinating? Maybe it's that fact that they don't require much maintenance. Perfect for those like me with not-so green thumbs! Or could it be their unique shapes and varying colors? I'm not sure, but I think I'd be happy with one of each spread around my house somewhere.
Pin It
{West Elm Glass Terrariums}
The perfect way to display succulents is in open air terrariums. Any open container with enough room to layer several components will work. So that means it's time to go raid the empty fish bowls, mason jars or those random jars you picked up at a garage sale and don't know what to do with. 
{pinterest}
Here's a taste of what you could create. Don't you just love the visual interest created by the exposed layers? Rumor has it that the "dirt" in these jars is a Cactus/Succulent Soil via Miracle-Gro. This will help with proper drainage since there is not a drainage hole in your container. Now find some pretty rocks and plop your succulent right on top. Easy peasy!

Need a little more inspiration? Here ya go...
{West Elm, Shane Powers Fish Bowls}

So let's apply what we've learned today to real life. I mean, let's face it, not many of our homes look like the images above, right? Simply grouping 3 of these together on a mantle or a coffee table would give you a great look. Make sure your containers are varying heights. If you use 3 of the same container, use books to create the height difference.

Must you shop at West Elm to find these pretty little succulents? Not at all! I've admired them numerous times at Home Depot and Lowes. And I'm pretty sure I've even spotted them at Big Lots and IKEA. We'll just thank the fine folks at West Elm by helping us to see their potential when potted in a killer container!

{Insert random thought here: These would make really great teacher's gifts. They could keep them in their classrooms and the kids could be responsible for caring for them!}

Here's an added bonus...if you're looking to create something really unique you may want to add a few miniatures. 

These precious teensy weensies can be found at The Oak Leaves on etsy.

Has anyone guessed why I'm a bit fascinated by today's topic? Oh, it wouldn't have anything to do with a certain 'Woodland' room that's in the making, now would it? It's definitely a thought...

Like what you've seen in today's post? I'd love to work with you to bring these visions into your own home. You can contact me here!
Related Posts Plugin for WordPress, Blogger...
 
Blogging tips